three.js Pixel Displacement Transition Effect

Prerequisites:
- three.js (basic knowledge)
- GSAP (basic knowledge)
Introduction
Lately, I’ve been studying up on three.js and getting my head around 3D concepts as they relate to the web. It’s been a fun journey so far. If you haven’t used it before, three.js can get very complex so I wanted to distill it down to something simple enough anyone could understand and practical enough to actually implement in their next web project.
Okay, enough preamble, here’s what we’re building.
Step 1: Basics Setup
First off, you’ll need a couple of libraries. Links to installation instructions linked below:
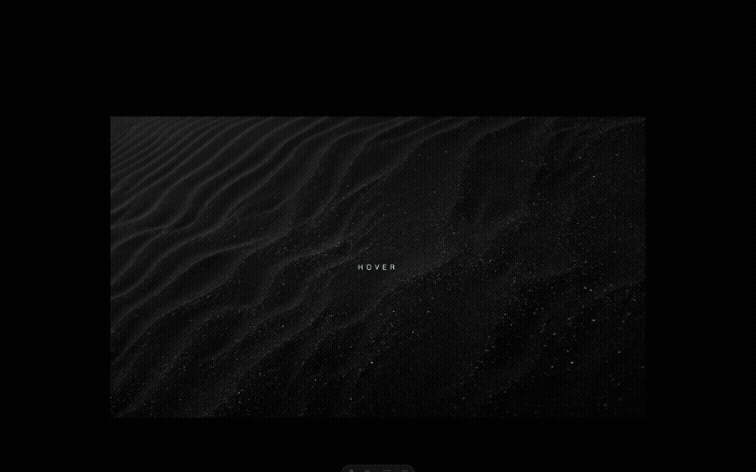
Next set up, we just need a couple of elements in our HTML markup:
<h1>Hover</h1>
<canvas class="webgl"></canvas>
And some simple CSS resets (plus some text styling):
* {
  margin: 0;
  padding: 0;
}

html,
body {
  overflow: hidden;
}

.webgl {
  position: fixed;
  top: 0;
  left: 0;
  outline: none;
}

h1 {
  font-size: 1rem;
  position: absolute;
  top: 50%;
  left: 50%;
  transform: translate(-50%, -50%);
  font-family: sans-serif;
  color: white;
  text-transform: uppercase;
  z-index: 999;
  letter-spacing: 0.5em;
  font-weight: 300;
}
Everything else will be handled in Javascript.
Step 2: three.js Setup
If you’re using npm you’ll first want to handle your imports. Otherwise, you can link directly using CDN or some other means depending on your build. Refer to each library’s documentation for details.
import * as THREE from 'three';
import gsap from 'gsap';
Next, we need some three.js basics. I won’t try to explain everything we’re adding here as it’s beyond the scope of this tutorial, but I’ll do my best to give some context for the various components. A lot of what we’re including off the bat is pretty standard (depending on what you’re trying to build). Here’s a quick rundown:
- Canvas & Scene: these just establish the three.js workspace we’ll be working in
- Loaders: the
textureLoader()allows us to pull in our images (we’ll need this later) - Mesh: we’ll set this up using
PlaneGeometryand start with just theMeshBasicMaterialso we can see something on screen - Sizes: our
sizesobject allows us to scale everything appropriately depending on the viewport size itself - Camera: I’ve gone with a
Perspectivecamera rather thanOrthographiceven though we’re working with a 2D image. This ensures our mesh’s aspect ratio remains locked regardless of the viewport size - Renderer: as the name implies, this renders our scene and
setPixelRatioensures our rendered pixels match the pixel density of our display (maxing out at 2x)
// =============================================================================
// Base
// =============================================================================
const canvas = document.querySelector('canvas.webgl');
const scene = new THREE.Scene();

// =============================================================================
// Loaders
// =============================================================================
const textureLoader = new THREE.TextureLoader();

// =============================================================================
// Mesh
// =============================================================================
const aspectRatio = 16 / 9;
const geometry = new THREE.PlaneGeometry(4, 4 / aspectRatio);
const material = new THREE.MeshBasicMaterial({
color: 0x0000ff
})
const mesh = new THREE.Mesh(geometry, material);
scene.add(mesh);

// =============================================================================
// Sizes
// =============================================================================
const sizes = {
width: window.innerWidth,
height: window.innerHeight,
};

window.addEventListener('resize', () => {
// Update sizes
sizes.width = window.innerWidth;
sizes.height = window.innerHeight;

// Update camera
camera.aspect = sizes.width / sizes.height;
camera.updateProjectionMatrix();

// Update renderer
renderer.setSize(sizes.width, sizes.height);
renderer.setPixelRatio(Math.min(window.devicePixelRatio, 2));
});

// =============================================================================
// Camera
// =============================================================================
const camera = new THREE.PerspectiveCamera(
75,
sizes.width / sizes.height,
0.1,
1000
);
camera.position.z = 2;
camera.lookAt(mesh.position);

scene.add(camera);

// =============================================================================
// Renderer
// =============================================================================
const renderer = new THREE.WebGLRenderer({
canvas: canvas,
antialias: true,
});
renderer.setSize(sizes.width, sizes.height);
renderer.setPixelRatio(Math.min(window.devicePixelRatio, 2));
With all of that in place… tada!

Okay, next let’s get our images loaded and render one on the object as a texture. We’ll create an object to handle our 2 images and use our textureLoader() to… well, load the images. Obviously, these can be sourced from the web or self-hosted within your project.
// =============================================================================
// Textures
// =============================================================================
const textures = {
img1: textureLoader.load(
'https://images.pexels.com/photos/2387793/pexels-photo-2387793.jpeg'
),
img2: textureLoader.load(
'https://images.pexels.com/photos/31979794/pexels-photo-31979794.jpeg'
),
};
Now, we just need to map that texture to our mesh:
const material = new THREE.MeshBasicMaterial({
// color: 0x0000ff,
map: textures.img1
})
If your image looks washed out, you’ll want to set the colorSpace for your image (we won’t need this later though):
textures.img1.colorSpace = THREE.SRGBColorSpace
Step 3: Shaders Setup
Now we’re getting into the meat of what makes this project special. We’ll start with the vertex shader, which is admittedly very boilerplate. We’re not doing anything special here other than defining our vUv variable so we can send it to our fragment shader.
// =============================================================================
// Shaders
// =============================================================================
const vert = `
varying vec2 vUv;

void main() {
vUv = uv;

gl_Position = projectionMatrix * modelViewMatrix * vec4(position, 1.0);
}
`;
The fragment shader is where things get more complex though. Let’s start with something simple.
First we need to change our mesh material from MeshBasicMaterial to ShaderMaterial. This material type requires the vertexShader and fragmentShader parameters. These are where we can assign the variables we’re declaring above.
We also need to define some uniforms that we can pass to our fragment shader. In this case, it will be our first texture image as texture1. The type we’ll set to 't' (for texture) and the value we’ll get from our textures object and assign it img1.
// =============================================================================
// Mesh
// =============================================================================
const aspectRatio = 16 / 9;
const geometry = new THREE.PlaneGeometry(4, 4 / aspectRatio);
const material = new THREE.ShaderMaterial({
uniforms: {
texture1: { type: 't', value: textures.img1 },
},
vertexShader: vert,
fragmentShader: frag,
});
Now, let’s go back to our shader declarations and set up our frag variable. Here we’re receiving our vUv variable from the vertex shader and also our uniform (texture1) from the ShaderMaterial. Everything else goes in the void main() function.
We can render that image in our fragment shader using the texture2D() function which takes 2 parameters – the texture itself (texture1) and the position (uv). We can then apply that to the built-in gl_FragColor variable.
const frag = `
varying vec2 vUv;

uniform sampler2D texture1;

void main() {
vec2 uv = vUv;

vec4 imgTexture = texture2D(texture1, uv);
vec4 finalColor = imgTexture;

gl_FragColor = finalColor;
}
`;
Ensure you haven’t missed any semicolons (shaders are picky) and you should see your image displayed once more. It’s likely too dark now though, so let’s go back and remove our colorspace fix from earlier.
// textures.img1.colorSpace = THREE.SRGBColorSpace;
Now we’re doing essentially the same thing (mapping an image texture to our mesh), but this time using shaders which allows us to do some fun manipulation. Before we do that though, we need to set up some sort of trigger for our effect.
Step 4: Raycasting
There are numerous ways you could trigger our intended effect: clicking, scrolling or even just time – repeating on a cycle or just set to a delay. To keep things (relatively) simple, though, I’ve gone with a hover effect.
The tricky thing about that though is that objects rendered with WebGL have no awareness of your standard event listeners. To get around this, we’ll do something in three.js known as “raycasting”.
Essentially, we draw a line (ray) from one point to another and allow three.js to tell us if that ray intersects with anything. For our purposes we’ll emit that ray from our mouse and point it in the direction of our camera and as our mouse moves we’ll detect if/when we intersect with our mesh. Let’s set that up.
Luckily, three.js makes this pretty painless. We’ll create a new Raycaster() instance and then set up the rayOrigin and rayDirection. This is just “dummy” data that we’ll replace with our mouse movement data shortly.
rayDirection.normalize() sets the length to 1 to keep things simple.
// =============================================================================
// Raycaster
// =============================================================================
const raycaster = new THREE.Raycaster();

const rayOrigin = new THREE.Vector3(-3, 0, 0);
const rayDirection = new THREE.Vector3(10, 0, 0);
rayDirection.normalize();

raycaster.set(rayOrigin, rayDirection);
Next, we will use event listeners to get data from our mouse movement.
Initially we’ll assign mouse as a three.js Vector2 with values way outside the viewport to ensure we don’t trigger any intersections on the initial page load.
Then, we’ll create a 'mousemove' event listener and assign x and y values to mouse accordingly. The math applied clamps these values so they go from -1 to 1 on both axes.
And then lastly, we want to make sure to reset our values if the mouse leaves the viewport entirely. This is accomplished with a 'mouseout' event listener.
// =============================================================================
// Mouse
// =============================================================================
const mouse = new THREE.Vector2(-1000, -1000);

window.addEventListener('mousemove', (e) => {
mouse.x = (e.clientX / sizes.width) * 2 - 1;
mouse.y = -((e.clientY / sizes.height) * 2 - 1);
});

window.addEventListener('mouseout', (e) => {
mouse.x = -1000;
mouse.y = -1000;
});
Step 5: Animation
Okay, now we’re going to set up our final three.js section. Typically in three.js, animation is accomplished using a tick function that performs an operation and then uses window.requestAnimationFrame(tick) to loop back and run the function again.
For our project, we just care about the ray intersecting with our mesh. So first, we’ll create a currentIntersect variable outside the tick function and set it to null.
Then we’ll cast a ray using setFromCamera with 2 parameters: mouse and camera. This casts a ray from the camera through our mouse which means it will trace our mouse movement.
Next up, we need to establish the objects we want to detect intersections for. We can use the intersectObjects() function for this. And in our case, we just need one object in the array: our mesh.
And finally, we can set up some conditionals to see if we’re intersecting and report back with some console logs. We’ll also need to call our renderer.render() again and then our aforementioned window.requestAnimationFrame(tick) to close out the loop and request it be run again.
// =============================================================================
// Animation
// =============================================================================
let currentIntersect = null;

const tick = () => {
// Cast a ray
raycaster.setFromCamera(mouse, camera);

const intersects = raycaster.intersectObjects([mesh]);

// // Check if we're hovering over the mesh
if (intersects.length > 0) {
if (currentIntersect === null) {
console.log('Mouse entered object');
}
currentIntersect = intersects[0];
} else {
if (currentIntersect !== null) {
console.log('Mouse left object');
}
currentIntersect = null;
}

// Renderer
renderer.render(scene, camera);

// Call tick again on next frame
window.requestAnimationFrame(tick);
};

tick();
Check your console and move your mouse in and out of the image to verify our raycaster is working correctly.
Step 6: The Effect
Alright, we’ve been scaffolding for a while now. It’s time to put all of that hard work to use and actually see our effect in action.
Let’s go back to our mesh and insert a few more uniforms that we’ll use in our fragment shader. We’ll include a couple of float uniforms (type: 'f') for the progress and intensity.
intensity is a helpful parameter that we can use to adjust the intensity of the effect. progress is essential for the actual animation effect – it will go from 0.0 to 1.0 (start to finish).
We’ll also include our 2nd texture along with the displacement map (displacement).
// =============================================================================
// Mesh
// =============================================================================
const aspectRatio = 16 / 9;
const geometry = new THREE.PlaneGeometry(4, 4 / aspectRatio);
const material = new THREE.ShaderMaterial({
uniforms: {
progress: { type: 'f', value: 0.0 },
intensity: { type: 'f', value: 1.0 },
texture1: { type: 't', value: textures.img1 },
texture2: { type: 't', value: textures.img2 },
displacement: { type: 't', value: textures.disp },
},
vertexShader: vert,
fragmentShader: frag,
});
const mesh = new THREE.Mesh(geometry, material);
scene.add(mesh);
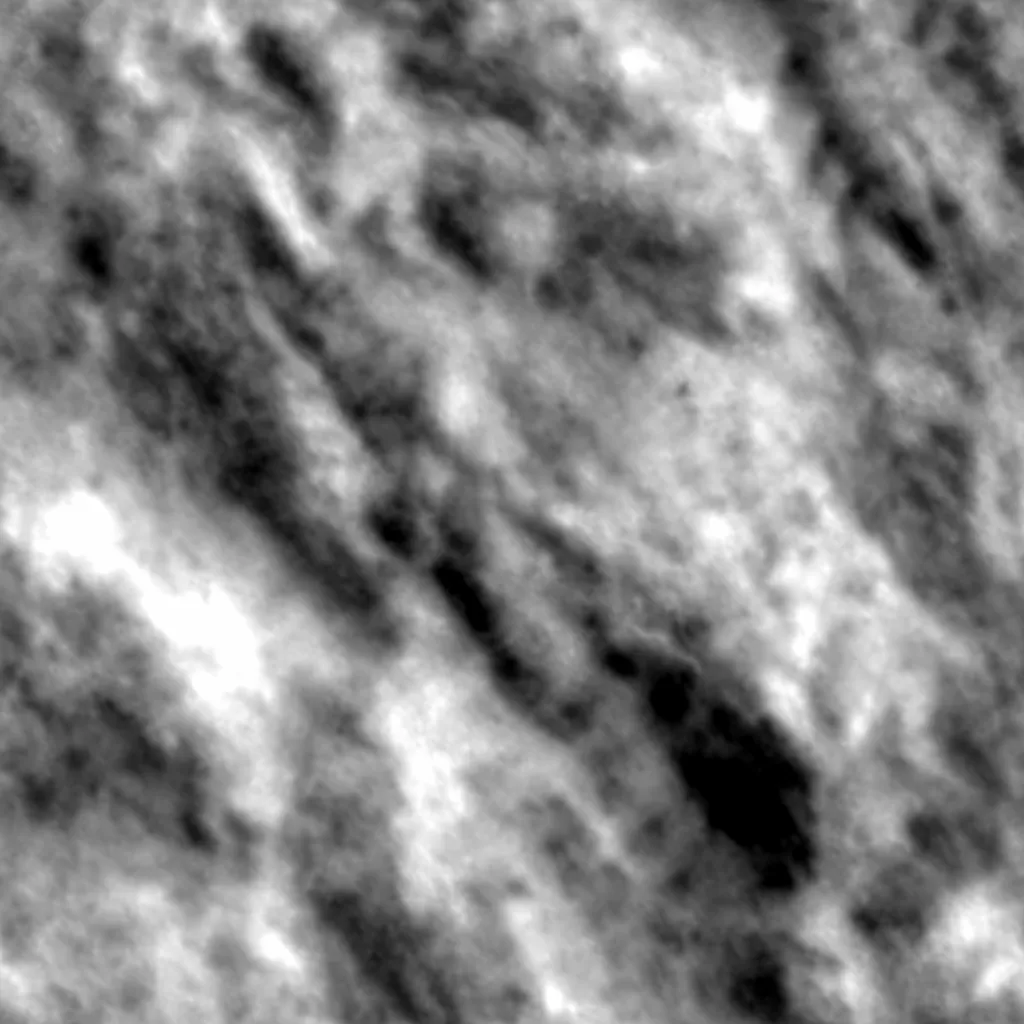
Of course, if you’re paying attention, you might have noticed we’ll need to add our displacement map image to our textures object so we’re referencing something that actually exists.
// =============================================================================
// Textures
// =============================================================================
const textures = {
img1: textureLoader.load(
'https://images.pexels.com/photos/2387793/pexels-photo-2387793.jpeg'
),
img2: textureLoader.load(
'https://images.pexels.com/photos/31979794/pexels-photo-31979794.jpeg'
),
disp: textureLoader.load(
'https://s3-us-west-2.amazonaws.com/s.cdpn.io/58281/rock-_disp.png'
),
};
The displacement map is a low resolution abstract black and white image with varying levels of black white and gray. These values are interpreted as 0 to 1 (black to white) and are used as a “sampling palette” for our effect. You can find displacement maps by searching the web or even creating your own.
Now we need to go back to our fragment shader and pull in these new uniforms and put them to use. Buckle up if you aren’t familiar with shaders.
Ahead of our main() function, we can include our new uniforms: texture2, displacement, progress and intensity.
Within the main() function we’ll start with sampling our displacement map using the texture2D() function again and then assign the x and y coordinates to dispVec. This grabs the value (0.0 to 1.0) at each coordinate point in our displacement map and then sets up a convenient vector for us to use.
Building on that, we can set up our distortion positions for each of our 2 textures (distPos1, distPos2). What we’re doing here is taking the position and then moving it according to the displacement map value multiplied by the intensity and then multiplied by the progress. The progress value is key because it all starts at 0.0. Your initial position will simply be your initial position plus 0.0 (aka, just your initial position). It will gradually move and become more distorted as progress goes from 0.0 to 1.0.
And then for the 2nd distortion position we’re doing the same thing, but inverted using some simple math, so that the transition feels organic.
From there we can set up our new textures (texture1, texture2) using the texture2D() function once more, which – if you remember – accepts 2 parameters (the image itself and the position). This time we’ll use the distortion position for the 2nd parameter.
Finally, we can assign all of this to our finalColor variable using mix() and use the progress value once more for the amount we’re mixing the first parameter with the second.
const frag = `
varying vec2 vUv;

uniform sampler2D texture1;
uniform sampler2D texture2;
uniform sampler2D displacement;

uniform float progress;
uniform float intensity;

void main() {
vec2 uv = vUv;

vec4 dispMap = texture2D(displacement, uv);
vec2 dispVec = vec2(dispMap.x, dispMap.y);

vec2 distPos1 = uv + (dispVec * intensity * progress);
vec2 distPos2 = uv + (dispVec * -(intensity * (1.0 - progress)));

vec4 texture1 = texture2D(texture1, distPos1);
vec4 texture2 = texture2D(texture2, distPos2);

vec4 finalColor = mix(texture1, texture2, progress);

gl_FragColor = finalColor;
}
`;
If you’ve checked your browser, you probably have noticed that nothing has changed – even when you hover over the image. That’s because we haven’t changed our progress variable yet.
We’ll want to accomplish that with a bit of GSAP and if you remember, this should only happen when the mouse is hovering over the image. Let’s go to our Animation section and add some GSAP to our conditionals.
We can clear out our console logs and add a gsap.to() function that manipulates our progress value. So we set the first parameter to mesh.material.uniforms.progress and then the second parameter is an object that holds the value, duration and ease timing function. The value for the truthy statement should go to 1 and the falsy statement should go back to 0. I won’t get into GSAP details, but feel free to play with the duration and easing to your heart’s content.
// Check if we're hovering over the mesh
if (intersects.length > 0) {
if (currentIntersect === null) {
gsap.to(mesh.material.uniforms.progress, {
value: 1,
duration: 0.5,
ease: 'power2.out',
});
}
currentIntersect = intersects[0];
} else {
if (currentIntersect !== null) {
gsap.to(mesh.material.uniforms.progress, {
value: 0,
duration: 0.5,
ease: 'power2.out',
});
}
currentIntersect = null;
}
Okay, now check your browser.
Conclusion
Whew! With so much of the framework established, you can now take this a ton of different ways. You can play with animation timing, different trigger effects, unique displacement effects, etc.
Here is another application using a scroll trigger and additional GSAP effects to pull off a more complete “site-ready” effect.
You can also compartmentalize your code better. Personally, I like having my shaders in separate files (e.g. img.vert and img.frag), but you may need additional plugins in your build to handle them (as well as your editor for syntax highlighting).
Good luck!